Dynamic Field Configuration - Key Aspects and Types
In this article, we will look at how to properly configure dynamic fields in our system, covering essential aspects for their activation and efficient use. We will also look at the different types of dynamic fields that exist and how they are created.
We will see what text & text area, select, checkbox, file, number and date fields are.
Previous concepts
 Where can I find this option? → Left side menu → Settings → Dynamic Fields → + Dynamic Fields
 Remember that in order to save and delete dynamic fields you need to have the save and delete permissions activated for each corresponding type.
To create a dynamic field, go to “Settings” on the left sidebar and, once there, in “Dynamic Fields”, choose which section of the platform you want to create the dynamic field in and click on the button at the top right “+ Dynamic Field”.
Once inside, it gives us the option to select different types of dynamic fields and configure them.
Key configuration aspects:
The following aspects are common elements to configure for the different types of dynamic fields:
Placeholder
In the "placeholder" box we have to enter the text that will be seen in the form. That is, it is the name that will be seen before filling in the field.
We recommend that the name of the "placeholder" field matches the "field name" field, as it will later be useful for generating variables in reports.
Default value
In the “default value” option you can define what the default value will be for the field you are configuring. This option is useful if you want to provide the person who is going to fill it in with the usual or recommended value for the field.
Field group
The “field_group” field will allow us to select which group of dynamic fields the created dynamic field will belong to.
Dependent on
In the "Dependent on" field, we can indicate that this dynamic field depends on another dynamic field of the "checkbox" type. This means that, when the main field is enabled, the dynamic field that depends on it will automatically be displayed. In this way, we can organize the dynamic fields in a hierarchical manner, making it easier for the dependent options to only be displayed once the field on which they depend has been activated.

Important: The dynamic fields created can only depend on a dynamic field of type "checkbox," and the dependent dynamic fields can be of any type except "checkbox."
If the dependent dynamic field is marked as required, it will be displayed within the “required fields” group in the platform, even if the dynamic field on which it depends is not required.
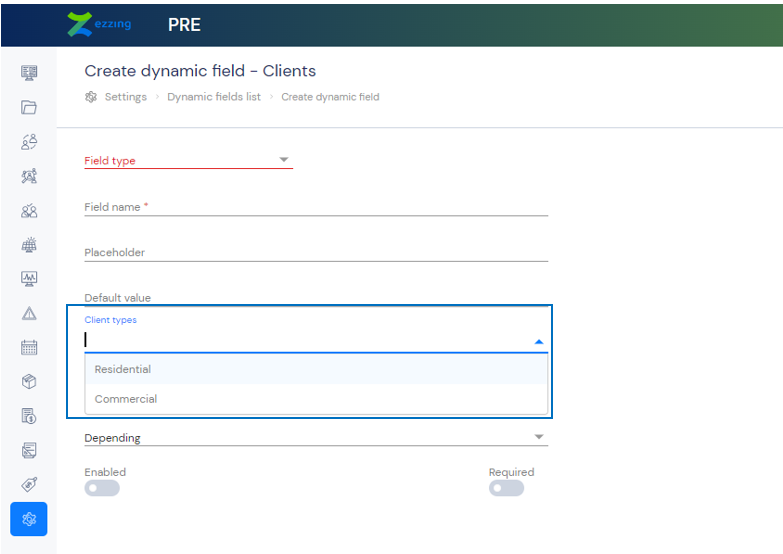
Types of clients
This refers to the type of client we are going to request this information from. The possible options are intended for segregation in future exports. We see, for example, that in this case we have two types of client, residential and commercial.

This option only will appear on the client dynamic fields.
Enabling dynamic field
To activate a dynamic field, you need to check the "Enabled" option. If this option is not selected (not in blue), the dynamic field will be created, but
cannot be used. This means that the information in that field cannot be completed.
Required field
If we want a dynamic field to be mandatory, we must mark the "Required" option (turning it blue). This means that we will not be able to advance in the data completion or registration process if this field does not contain information. The exception to this rule is opportunity type fields, where it will be allowed to continue with the sales process, although the system will warn about sub-statuses with required fields not completed.
Basic Information
The "Basic Info" checkbox will only be available for the dynamic fields section of opportunities. If it is activated (in blue), the dynamic field will be considered basic and will appear in the "Summary" tab within the Opportunities section.
Show in App
By checking the "Show in app" option, the dynamic field will be available for viewing in the installer app.
This option only can be applied to opportunity dynamic fields
Dynamic Field Types
Below we will see the different types of dynamic fields available.
Text Type:
This type of dynamic field is ideal for collecting alphanumeric information of moderate length. It is commonly used for data such as names, email addresses, phone numbers, or any other short, concise information.
Text Area Type:
Similar to the text field, but with a larger character capacity, the text area is suitable for collecting more extensive information. It is useful when detailed comments, extensive observations, or expanded descriptions of products or services are needed.
Select Type:
The dynamic selection field is valuable when we want to offer users predefined options to choose from. It allows you to create drop-down lists or menus of options where users can select a single answer. This is useful for collecting preferences or allowing users to choose between different alternatives.
If you want to remove one of the configured options within the select type dynamic field, you will have to edit the dynamic field and deactivate the desired option by clicking on the "Enable option" button.
If you want to remove one of the options from a field that has already been configured and is in use, the information of the selected option will be saved.
When we have several options created, by clicking on the icon on the left (three lines), you can move through them to place the options in the desired order, for example, option A can be placed last. We can do this by clicking on the three lines that can be seen on the left side of each option and moving it to the desired place.
Checkbox Type:
Checkbox fields are ideal when we need users to confirm or activate certain information. They allow users to select options using checkboxes. For example, you could create a dynamic checkbox field called “Financing” that would be checked (blue) to determine if you will need it or not (grey) if you will not need financing.
File Type:
We will use this type of fields when we want to give the client the option of attaching a document to us, through the client portal.
 These documents can be: .peg, jpg, jpe, png, txt, docx, pdf, xls, xlsx, dot, eml, wav, mp3, mp4, dwg, .zip, .rar. (Images, videos, pdfs/word/excel, compressed files, etc.)
 Type Number
This field type is specifically designed to collect numerical data, this dynamic field is essential for requesting measurements, quantities, times, distances, powers and other quantifiable values.
Type Date
We will use this type of field to collect or indicate specific dates, both from the platform and from the commercial simulator, installer app or by requesting it from the client from the client portal.
To create this field you must choose its type as "Date":
When you click to fill in the field, a calendar appears to select the date on the calendar. This date is displayed with the following structure (DD/MM/YYYY). In our API, SQS and Data Lake services, however, it will be displayed in the YYYY/MM/DD format.
The only way to enter the date is by selecting it from the calendar. The date cannot be added manually. Both past and future dates will be available to select.
Related Articles
Related Articles
Dynamic Fields Configuration - Groups
In this article, we'll explore what dynamic field groups are and walk you through the process of creating a group step-by-step. Previous concepts: What are dynamic fields and what are they used for? Where can I find this option? → Left side menu → ...Commercial simulator - Dynamic Fields
In this article we will explain how to configure the dynamic fields for the commercial simulator and, once configured, how they can be seen on the platform and more specifically within the opportunity, the data that we have filled in these fields. ...What are dynamic fields and what are they used for?
In this article, we will see an introduction to dynamic fields and discover their use in the platform and their importance when managing customer information. Where can I find this option? → Left side menu → Settings → Dynamic fields What are dynamic ...Opportunities - Fields to fill
In this article we will explain the functionalities of the "Fields to fill" tab that we find in the opportunities view. In this tab we will find all those fields for which we need information from the client. This information is crucial, as it ...Flow Configuration - Visibility in Client Portal
In this article we will see how to configure the elements that will be visible in the Customer Portal in each substate of our sales flows. Where can I find this option? → Settings → Opportunity types and processes Remember that this option will only ...